
Hi there, crochet lovers and superhero fans!
Today, I bring you a very special project that you're going to love: a Deadpool amigurumi. This beloved character, known for his sarcastic humor and action-packed adventures, is the perfect addition to your amigurumi collection.
In this tutorial, we'll be creating our very own Deadpool step by step. Whether you're a beginner or an expert in the art of crochet, this project is a fantastic opportunity to challenge your skills and learn new techniques. We'll be using different yarn colors and basic stitches to bring this charismatic antihero to life.
Join me on this crochet adventure and discover how to turn simple yarn into an iconic character. Let's get started and have some fun!
I'd love to see how yours turns out!
My Instagram: @Yuyiurumi
Without further ado, let's get started with the materials and instructions!
Heads up to (Zazzle Art), I used their drawing to inspire this pattern:

---
Deadpool Amigurumi
Youtube Tutorial: Playlist
Materials:
- 4mm hook
- 2.5mm hook
- Poly-fill
- Acrylic yarn:
- Red yarn
- Black yarn
- Brown yarn
- Gray yarn
Stitch Symbols:
- Ch: chain
- SL: slip stitch
- Sc: single crochet
- Inc: make 2 stitches in one stitch
- Dec: make 1 stitch from two stitches
- Hdc: half double crochet
- Dc: double crochet
- FLO: front loop only
- BLO: back loop only
---
Arms
- **R1:** (red) MR 6 sc
- **R2:** (red) 6 inc (12)
- **R3-4:** (red) 12 sc (12)
- **R5:** (black) (dec, 2 sc) x3 (9)
- **R6:** 9 sc (9)
- **R7-12:** (red) 9 sc (9)
- **R13:** (black) (dec, 7 sc) (8)
- **R14:** Fold the arm and make 3 sc to close the opening.
Make 2 pieces, then sew them to the body.
---
Legs
- **R1:** (black) MR 6 sc
- **R2:** inc x 6 (12)
- **R3:** (1 st, inc) x 6 (18)
- **R4:** (2 sc, inc) x 6 (24)
- **R5:** BLO 24 sc (24)
- **R6:** 8 sc, 4 dec, 8 sc (20)
- **R7:** 6 sc, 4 dec, 6 sc (16)
- **R8-12:** 16 sc (16)
Don't forget to stuff firmly.
From this part, the pattern changes for each leg:
---
Left Leg
- Move marker to the center.
- **R13:** BLO (red) 6 sc, (black) 10 sc (16)
- **R14-15:** 16 sc (16)
- **R16:** (red) FLO 2 sc, 3 hdc, 1 sc, (black) 4 sc, 3 hdc, 3 sc; end with a slst and fasten off.
Make a second leg, but don't cut the yarn.
---
Right Leg
- Move marker to the center.
- **R13:** BLO (black) 9 sc, (red) 7 sc (16)
- **R14-15:** (black) 9 sc, (red) 7 sc (16)
- **R16:** (black) FLO 2 sc, 3 hdc, 5 sc, (red) 3 hdc, 3 sc; end with a slst and fasten off.
Don't forget to stuff both legs.
---
Joining the Legs
- Attach red yarn to the center of a leg (viewing your amigurumi from the back).
- Make 3 ch.
- Join with a sc to the center of the other leg.
- **R16:** (red) 3 sc in the leg, (black) 10 sc, (red) 3 sc, 3 sc in the chains, 3 sc in the other leg, (black) 10 sc, (red) 3 sc, 3 sc in the chains (38)
- **R17-18:** (red) 3 sc, (black) 10 sc, (red) 9 sc, (black) 10 sc, (red) 6 sc (38)
- **R19:** (red) 3 sc, (black) 10 sc, (red) 4 sc, dec x 2 (36)
- **R20-21:** (red) 3 sc, (black) 10 sc, (red) 8 sc, (black) 10 sc, (red) 5 sc (36)
- **R22:** (black) 36 sc (36)
- **R23:** (black) (4 sc, dec) x 6 (30)
- **R24:** BLO (red) 3 sc, (black) 10 sc, (red) 5 sc, (black) 10 sc, (red) 2 sc (30)
- **R25-26:** (red) 3 sc, (black) 10 sc, (red) 5 sc, (black) 10 sc, (red) 2 sc (30)
- **R27:** (red) dec, 2 sc, (black) dec, 3 sc, dec, 1 sc, (red) dec, 3 sc, dec, (black) 3 sc, dec, 3 sc, (red) dec, 1 sc (23)
- **R28:** (red) 4 sc, (black) 5 sc, (red) 6 sc, (black) 6 sc, (red) 2 sc (23)
- **R29:** (red) 5 sc, (black) 4 sc, (red) 7 sc, (black) 5 sc, (red) 2 sc (23)
- **R30-31:** (red) 3 sc, (black) 8 sc, (red) 4 sc, (black) 8 sc (23)
- **R32:** (red) 5 sc, (black) 4 sc, (red) 8 sc, (black) 5 sc, (red) 1 sc (23)
- **R33:** (red) 23 sc
Move marker to the center of the back.
- **R34:** (red) (dec, 2 sc) x 5, dec, 1 sc (17)
- **R35:** 8 sc, 1 inc, 8 sc (18)
---
Head
- **R36:** (2 sc, inc) x 6 (24)
- **R37:** (3 sc, inc) x 6 (30)
- **R38:** (4 sc, inc) x 6 (36)
- **R39:** (5 sc, inc) x 6 (42)
- **R40:** (6 sc, inc) x 6 (48)
- **R41-52:** 48 sc (12 rows)
- **R53:** (6 sc, dec) x 6 (42)
- **R54:** (5 sc, dec) x 6 (36)
- **R55:** (4 sc, dec) x 6 (30)
- **R56:** (3 sc, dec) x 6 (24)
- **R57:** (2 sc, dec) x 6 (18)
- **R58:** (1 sc, dec) x 6 (12)
- **R59:** 12 sc (12)
- **R60:** 3 sc, 9 hdc (12)
- **R61:** 12 sc (12)
- **R62:** 6 dec (6)
Fasten off and sew the point of the tail to the head. Now it's time to sew the arms to the body.
If the "cross-shaped chest" didn't turn out as perfect as you wanted, you can use a needle and embroider with yarn for a better shape or use acrylic paint. That's it for the body!
---
Eyes
Right Eye:
- **R1:** MR 8 sc, sl st
- **R2:** ch 1, 3 hdc in same sc, 1 sc, 3 dc in same st, 1 hdc, 2 sc, 2 dc in same st, 2 dc in same st, sl st
- **R3:** ch 1, 1 sc, 2 hdc in same st, 1 sc, 2 hdc in same st, 2 hdc in same st, 5 sc, 2 hdc in same st, 2 hdc in same st, 1 sc, 1 sl st
Left Eye:
- **R1:** MR 8 sc, sl st
- **R2:** ch 1, 2 dc in same st, 2 dc in same st, 2 sc, 1 hdc, 3 dc in same st, 1 sc, 3 hdc in same st, sl st
- **R3:** ch 1, 1 sc, 2 hdc in same st, 2 hdc in same st, 5 sc, 2 hdc in same st, 2 hdc in same st, 1 sc, 2 hdc in same st, 2 hdc in same st, 1 sc, sl st
Fasten off and sew both eyes to the head. The pointy edges should face the nose. For the white part, you can use the felting technique or white felt. Use a felting needle to shape the wool or simply glue the felt.
---
From here, change to 2.5mm hook and thinner yarn.
Red Button (Buckle)
Make 2 pieces (red yarn):
- **R1:** MR 6 sc (6)
- **R2:** inc x 6 (12)
- **R3:** (1 sc, 1 inc) x 6 (18)
If using thinner yarn with a 1.5mm hook, add one or two more rows in this way:
- **R4:** (2 sc, 1 inc) x 6 (24)
- **R5:** (3 sc, 1 inc) x 6 (30)
Sew both pieces together, stuffing them with a circular piece of thick cardboard of the same size.
---
Belt
Using brown yarn.
- Ch 30 or until it reaches the size of your amigurumi’s hip, join with a slip stitch.
---
Harness
- **Ch 8**
- **R1:** 7 sc
- **R2:** Dc, hdc, 3 sc, hdc, dc
- **R3:** (Dc, ch 1, dc) in one stitch, hdc, 3 slst, hdc, (dc, ch 1, dc) in one stitch. Fasten off.
**Attach yarn to the base of the work:**
- **R1:** Dc, hdc, 3 sc, hdc, dc
- **R2:** (Dc, ch 1, dc) in one stitch, hdc, 3 slst, hdc, (Dc, ch 1, dc) in one stitch.
Make the straps: Attach yarn to upper corner of the harness and ch 15, then attach with a slip stitch to the same side down corner. Repeat for second strap.
The katanas’ holder has to be embroidered with one thread of yarn.
---
Bags
Make 4 using brown yarn
- **R1:** Ch 4
- **R2:** Ch 1, turn your work, 4 sc.
- **R3:** Ch 1, turn your work, 1 inc, 2 sc, 1 inc (6)
- **R4-11:** Ch 1, turn your work, 1 sc in each stitch (6)
**Fold and sew to form the bag shape. Finally, sew each bag to the belt.**
---
Katanas
Make 2 using gray yarn.
- **R1:** MR 3 sc
- **R2:** 3 inc (6)
- **R3:** (1 sc, 1 inc) x 3 (9)
- **R4-22:** 9 sc until desired length.
**Shape using an ice cream stick.**
---
Base of the Katanas (Tsubas)
Make 4 rectangles:
- **R1:** Ch 11, turn
- **R2-3:** Ch 1, 10 sc, turn
- **R4:** Ch 1, 4 sc, 2 ch, 4 sc, turn
- **R5:** Ch 1, 10 sc, fasten off.
**Sew two pieces with cardboard in the middle to form one tsuba.**
Make 2 rectangles of cardboard (if your cardboard is thin, if its thicker, just ONE would be ok), to put in the middle of the crocheted pattern.
---
Handle of the Katanas
- **R1:** MR 4 sc
- **R2:** (1 inc) x 4 (8)
- **R3-13:** 1 sc in each stitch until desired length.
**Sew to the tsuba. Embroider the red ornament (x) onto the handle.**
---

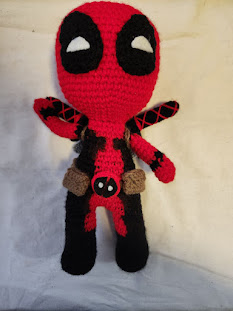
This concludes the pattern. I hope you enjoy making your Deadpool amigurumi!
Comments
Post a Comment